Apple Watch Screen Repairdemands a precise set of professional tools and high-quality replacement parts to restore your smart device in 2026. Whether you are dealing with a minor scratch or a shattered display, finding the correct solutions on Amazon ensures your wearable remains fully functional and ready for daily use.
Quick answer: For most people in 2026, the best apple watch screen repair is the Repair Approach — our #1 rated choice. See the full ranked comparison, alternatives and buying advice below.
Choosing Between Professional Services And DIY Fixes
Choosing between professional services and DIY fixes requires a clear understanding of the risks and benefits involved. While fixing the device yourself saves money, professional assistance guarantees high quality and maintains the water resistance. Assess your technical skills before starting any Apple Watch Screen Repair projects.
The Cost Of Official Screen Replacements
Authorized service centers offer the most reliable replacement results but come with a hefty price tag. For older watch models, the cost of an official fix might even exceed the current market value of the entire device. This financial aspect forces many smart wearable users to seek alternative repair methods.
Opting for third-party repair services can secure much better pricing options that fit your budget easily. However, you must verify the reputation of these local shops to ensure they use high-grade parts. Investing in premium replacement components is crucial to keeping your daily wearable performing like a brand-new device.
Pros And Cons Of Doing It Yourself
Doing the work yourself provides a highly rewarding experience for tech-savvy individuals who enjoy fixing gadgets. You can purchase complete replacement packages online that contain all the necessary materials for a successful fix. This hands-on approach gives you total control over the entire restoration process.
On the other hand, a lack of experience can lead to permanent damage to the delicate internal ribbon cables. You must exercise extreme patience and use steady hands when separating the broken glass from the frame. Preparing a clean workspace is the first step toward achieving clean and easy Apple Watch Screen Repair solutions.
Warranty and AppleCare Considerations
Before attempting any physical modifications, always check your current warranty status and coverage options. Standard warranties do not cover accidental damage, but active protection plans offer cheap screen replacements. Understanding these policies saves you from making costly mistakes that could void your active coverage.
If your device is no longer covered under any official protection program, looking for alternative fixes is a smart move. Purchasing individual parts and tools allows you to extend the lifespan of your favorite smartwatch. This proactive approach keeps your budget intact while restoring the good condition look of your wearable display.
Evaluating Third Party Repair Center Quality
Finding a trustworthy local technician requires reading honest customer reviews and asking about part warranties. Many independent businesses offer rapid turnaround times, often returning your fully fixed watch within a single afternoon. This convenience is perfect for busy individuals who rely on their wearables for daily tracking.
However, you must ensure that the repair shop uses specialized machinery to apply the outer display glass correctly. Without professional bonding tools, the touch screen might lose its sensitivity or lift from the frame later on. Always prioritize established shops that stand behind their craft with a written performance guarantee.
Safety Precautions For Handling Swollen Batteries
Opening a damaged smartwatch exposes you to potential hazards, especially if the internal battery has begun to swell. A swollen battery is highly unstable and can easily catch fire if punctured by sharp metal tweezers or tools. You must wear protective eyewear and work in a well-ventilated space to ensure your personal safety.
If you notice that your battery has expanded, stop the repair process immediately and handle the component with extreme care. Place the damaged part in a fireproof container and dispose of it at a certified electronics recycling facility. Safety should always remain your absolute highest priority during any device restoration project.
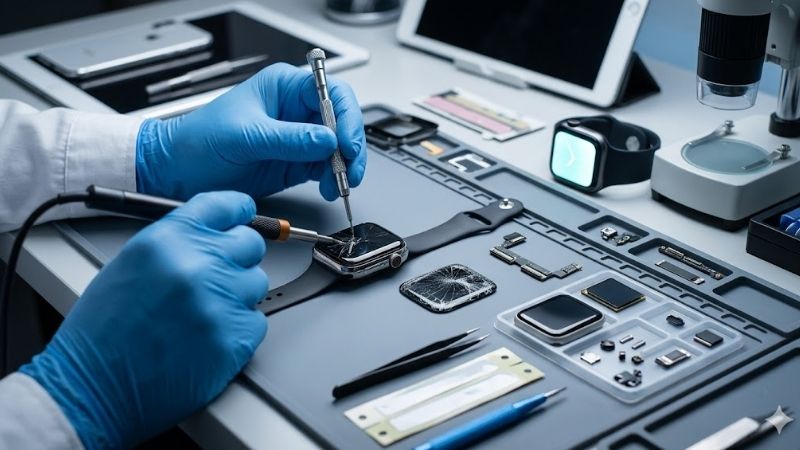
Essential Tools Found On Amazon For Screen Repair
Acquiring the correct equipment is the foundation of any successful restoration project in your home workshop. Using specialized tools prevents damage to the sensitive touch sensors and internal electronics. We will look at the essential products you must order to prepare for your Apple Watch Screen Repair tasks properly.
High Quality Adhesive Tape Requirements
High-quality adhesive is absolutely essential to maintain the structural integrity and dust protection of your device. Standard glue will not provide a strong enough seal, leading to loose glass and future display failures. You should look for specialized double-sided tape designed specifically for smart wearable frames.
Applying the adhesive requires a steady hand and absolute precision to ensure there are no gaps around the border. A poor seal allows moisture to penetrate the casing, which can ruin the internal circuit board permanently. Spending time to align the adhesive correctly is a vital step that guarantees a professional and clean finish.
Precision Screwdrivers And Opening Tools
Precision screwdrivers and plastic pry tools are required to open the watch casing without scratching the metal. You will need specialized driver bits to remove the tiny internal screws that secure the battery and display connectors. Having these exact tools ready prevents stripped screws during complex Apple Watch Screen Repair steps.
Plastic spudgers are recommended because they do not conduct electricity, reducing the risk of short circuits. Metal tools should be avoided when working near the delicate internal lithium battery. Using the right materials ensures a safe working environment, protecting both your health and the sensitive smart watch components.
Specialized Heating Pads For Adhesive Softening
Softening the original factory adhesive is a crucial step before attempting to pry the screen open. Specialized heating pads or heat guns provide controlled warmth that relaxes the glue without overheating the battery. This gentle process makes screen removal much easier and reduces the force required to separate the display glass.
You must monitor the temperature closely during this step to avoid causing thermal damage to the internal display panel. Applying heat in short intervals is the safest method to achieve the desired results. Once the adhesive is sufficiently soft, you can easily slide your thin pry tools under the glass to lift the screen panel.
Clamping Tools For Securing The Screen Assembly
Once the new screen has been aligned, you must apply constant and even pressure to ensure a permanent seal. Specialized spring clamps or plastic clips are designed to hold the display firmly against the frame while the glue cures. This step prevents the corners of the glass from lifting up after the restoration is complete.
Avoid using excessive force when clamping the watch, as too much pressure can crack the newly installed glass display panel. Leave the device clamped for at least three hours to allow the bonding agent to dry completely. This small step guarantees that your smartwatch remains strong and water-resistant during your daily activities.
Step By Step Guidelines For Screen Restoration
Following a structured, step-by-step process is the key to completing your device restoration without any errors. Patience and attention to detail will ensure that every internal connector is properly aligned and secured. Let us examine the precise sequence of actions required for seamless Apple Watch Screen Repair results.
Safe Disassembly of the Smart Wearable
The disassembly process begins with applying gentle heat to the outer edges of the glass panel. Once the glue is soft, use a thin suction cup and a plastic pick to create a small gap between the screen and the metal frame. Carefully slide the pick around the perimeter to slice through the remaining adhesive holding it down.
As you lift the screen, be extremely mindful of the delicate ribbon cables connected to the logic board. Slowly disconnect these cables using your plastic tools before completely removing the damaged display assembly. Rushing this step can tear the connectors, resulting in expensive damage that is extremely difficult to fix.
Cleaning The Frame From Old Glue Residue
Once the broken display is removed, you must clean the metal frame thoroughly to prepare it for the new glue. Any remaining adhesive residue or glass dust will prevent the new seal from bonding correctly, leading to future display issues. Use a small amount of isopropyl alcohol and a clean microfiber cloth to wipe the edges.
Taking your time during the cleaning phase ensures a flat surface for the replacement display to sit on. Check the frame under a bright light to confirm all debris has been completely removed. This attention to detail is what separates a successful home repair from a sloppy job that will fail after just a few days of normal use.
Applying New Waterproof Adhesive Seals
Applying the new waterproof adhesive is the final critical step before securing your replacement screen. Position the custom-cut adhesive tape precisely along the clean metal border, ensuring there are no folds or air bubbles. Once the tape is in place, carefully align and connect the new display ribbon cables to the board.
Gently press the replacement screen down into the frame, applying even pressure along all four edges. Using specialized screen clamps for a few hours helps the adhesive cure properly, ensuring a tight and waterproof seal. Congratulations on completing a successful Apple Watch Screen Repair work that restores your device to life.
Reconnecting Display Ribbon Cables Securely
Aligning the tiny gold pins of the ribbon connectors requires extreme care and a pair of fine plastic tweezers. You must push the connectors down gently until you hear a soft click, confirming a secure electrical connection. Skipping this step can lead to a black screen or unresponsive touch controls when you power on the device.
Before sealing the watch completely, it is wise to run a quick diagnostic test by powering on your device. Check the brightness levels and test the touch sensitivity across all areas of the newly installed display. Verifying functionality early saves you from the frustration of reopening a fully glued and completed assembly later.
Find out more:
- Ipad 10th Generation
- Macbook Pro Black Lines Bottom Screen
- Iphone 15 Vs 15 Plus
- Iphone 17 Pro Max Screen Protector
Comparison of Common Watch Repair Options
| Repair Approach | Average Setup Cost | Required Skills | Success Rate | Time Invested |
| DIY Home Repair | Low-cost toolkits | Advanced tech skills | Moderate success | 2-3 Work hours |
| Local Repair Shop | Moderate rates | Professional staff | High reliability | 1-2 Service days |
| Official Services | Premium pricing | Certified technicians | Perfect results | 5-7 Shipping days |
Recommended Products

PrimeSUPFINE Magnetic for iPhone 15 Pro Max Case (Compatible with MagSafe) (Military Grade Drop Protection) Translucent Matte Shockproof Phone Cover, Black

PrimeOtterBox iPhone 15 Pro MAX (Only) Commuter Series Case – Black, Slim & Tough, Pocket-Friendly, with Port Protection
![Miracase Magnetic for iPhone 15 Pro Max Case 6.7'' [Compatible with Magsafe] Full-Body Drop Proof Bumper Phone Case for iPhone 15 Pro Max with Built-in 9H Tempered Glass Screen Protector,Black](https://m.media-amazon.com/images/I/714xw16BTrL._AC_SL1500_.jpg)
PrimeMiracase Magnetic for iPhone 15 Pro Max Case 6.7'' [Compatible with Magsafe] Full-Body Drop Proof Bumper Phone Case for iPhone 15 Pro Max with Built-in 9H Tempered Glass Screen Protector,Black
As an Amazon Associate we earn from qualifying purchases. Product prices and availability are accurate as of the date/time indicated.
Conclusion
Choosing to perform an Apple Watch Screen Repair is a practical and rewarding way to extend your device’s life in 2026. By carefully selecting high-quality replacement parts on Amazon and following proper safety protocols, you can achieve professional results at a fraction of the cost, making your favorite smartwatch look new again.
Top-Rated Picks
![Ailun 3 Pack Screen Protector for iPhone 17 / iPhone 16 Pro [6.3 inch] with Installation Frame, Dynamic Island Compatible, Case Friendly[Not for iPhone16/16Plus/16Pro Max/17Pro/17Pro Max/Air]](https://m.media-amazon.com/images/I/710E6kA3HWL._AC_SL1500_.jpg)
![Ailun Screen Protector for iPhone 16 Plus/iPhone 15 Plus/iPhone 15 Pro Max [6.7 Inch] Display 3 Pack Tempered Glass, Dynamic Island Compatible, Case Friendly[Not for iPhone 16 Pro Max 6.9 Inch]](https://m.media-amazon.com/images/I/71S7Ej-DfQL._AC_SL1500_.jpg)
![Ailun 2 Pack Screen Protector for iPad Pro 12.9 Inch Display [2022 & 2021 & 2020 & 2018 Release] Tempered Glass [Face ID & Apple Pencil Compatible] Ultra Sensitive Case Friendly](https://m.media-amazon.com/images/I/81AXdJIrJPL._AC_SL1500_.jpg)
![Ailun Screen Protector for iPad Air 11 Inch 2026/2025/2024 [8/7/6th Gen M4/M3/M2], iPad Pro 11 inch 2025/2024 [6/5th Gen M5/M4],Tempered Glass Face ID Apple Pencil Compatible Case Friendly 2 Pack](https://m.media-amazon.com/images/I/71nfU3SNuNL._AC_SL1500_.jpg)
![Ailun Screen Protector for iPad 11th A16 2025 [11 Inch] / 10th Generation 2022 [10.9 Inch], Tempered Glass [Face ID & Apple Pencil Compatible] Ultra Sensitive Case Friendly [2 Pack]](https://m.media-amazon.com/images/I/615KCcOkk4L._AC_SL1500_.jpg)
| Product | Brand | Rating | Reviews | Price |
|---|---|---|---|---|
| Ailun 3 Pack Screen Protector for iPhone 17 / iPhone … | Ailun | ★ 4.6 | 1132.9k | $6.98 |
| Ailun Screen Protector for iPhone 16 Plus/iPhone 15 P… | Ailun | ★ 4.6 | 1132.9k | $5.98 |
| Ailun 2 Pack Screen Protector for iPad Pro 12.9 Inch … | Ailun | ★ 4.6 | 141.5k | $9.89 |
| Ailun Screen Protector for iPad Air 11 Inch 2026/2025… | Ailun | ★ 4.6 | 141.4k | $7.88 |
| Ailun Screen Protector for iPad 11th A16 2025 [11 Inc… | Ailun | ★ 4.6 | 141.4k | $7.98 |
Ready to decide? Our #1 pick for 2026 is the Repair Approach.
Live price & availability on Amazon.
")
")
")
")


Write Your Review
No reviews yet. Be the first to share your experience!