
The best welding helmets for most people are auto-darkening models with a true-color lens, a viewing area of at least 3.5 by 1.75 inches, a grind mode, and enough adjustment range to stay comfortable through a full work session; the right choice depends on whether you prioritize low cost, a wide view, TIG sensitivity, or maximum head-and-neck protection.
As an Amazon Associate we earn from qualifying purchases at no extra cost to you.

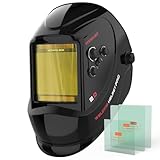


Best welding helmets by situation
| Situation | Best fit | What to prioritize | Typical market range |
|---|---|---|---|
| Occasional repairs and hobby work | Entry-level auto-darkening helmet | Shade 9–13, external grind control, replaceable batteries | $50–$120 |
| Frequent MIG, flux-cored, or stick welding | Professional four-sensor helmet | Large viewing area, sensitivity and delay controls, durable shell | $150–$350 |
| Low-amperage TIG and detailed fabrication | High-sensitivity auto-darkening helmet | Reliable detection below 10 amps, shade 5–13 or wider, clear optics | $200–$450 |
| Long daily work sessions | Lightweight professional helmet | Balanced headgear, low front weight, replaceable sweatband | $250–$500 |
| Grinding, cutting, or dusty outdoor work | Helmet with grind and cut modes | Dedicated mode buttons, side protection, impact-rated cover lenses | $100–$350 |
Our top picks
Best overall: Lincoln Electric VIKING 3350
The Lincoln Electric VIKING 3350 is a strong all-purpose choice when a large view and optical clarity matter more than minimizing price. Its 3.74-by-1.73-inch viewing area is notably wide for positioning a joint, and the auto-darkening lens uses a variable shade range suitable for common MIG, stick, and TIG work. The four-sensor design helps maintain arc detection when the helmet is angled or partially obstructed.
Its headgear offers independent adjustments for fit, crown position, and distance from the face. That matters because a helmet that sits too far forward feels heavier than its scale weight suggests. The trade-off is bulk: this is a substantial professional helmet, and its large shell can be less convenient in cramped spaces.
Best for a wide field of view: Miller Digital Elite
The Miller Digital Elite is aimed at welders who want a broad viewing window and digital control over shade, sensitivity, and delay. Its 3.81-by-1.85-inch lens is among the larger formats commonly available, giving better peripheral awareness when following a long bead or checking the workpiece without lifting the helmet.
Four arc sensors and multiple operating modes make it versatile for welding and grinding. The digital interface is more precise than a simple dial, but it also adds controls that need to be set correctly. If you regularly switch between bright outdoor work, indoor fabrication, and low-amperage TIG, the flexibility is useful. For occasional welding, it may be more helmet than necessary.
Best for TIG sensitivity: 3M Speedglas Welding Helmet 9100
The 3M Speedglas 9100 family is designed for demanding welding environments, including TIG work where the arc can be difficult for less sensitive helmets to detect. Depending on the version, the viewing area is approximately 3.7 by 1.8 inches, with shade settings covering common welding processes and separate light-state options for setup work.
The 9100’s headgear is one of its main advantages. It allows adjustment of the helmet’s distance, height, angle, and tension, helping distribute pressure instead of concentrating it at the forehead. Some configurations include side windows or an optional hard-hat setup. Check the exact model’s certifications and included accessories, because the 9100 name covers several configurations rather than one identical helmet.
Best value for occasional work: an entry-level four-sensor helmet
A good entry-level four-sensor helmet can be the best purchase for home repairs, farm maintenance, and infrequent fabrication. Look for a shade range of at least 9–13 for welding, a separate shade 3 or 4 light state, sensitivity and delay adjustments, and a viewing area around 3.6 by 1.7 inches or larger.
At this level, optical clarity and headgear vary more than the advertised shade range. A helmet with a slightly smaller lens but stable, comfortable headgear is often preferable to a large, poorly balanced shell. Avoid models that offer only one fixed sensitivity setting if you plan to TIG weld or work in bright surroundings.
Lens type: fixed shade, auto-darkening, or variable shade?
Auto-darkening lenses
Auto-darkening helmets remain light while positioning the torch, then darken when the arc starts. They are the most practical choice for most users because they reduce the need to repeatedly nod the helmet down. Choose a model with at least two sensors; four sensors provide better redundancy when the arc is partly blocked by a workpiece, pipe, or tight joint.
Variable-shade lenses
A variable-shade lens lets you select the darkness, commonly from shade 5–9 or 9–13. This is more useful than a broad advertised range if the controls are easy to reach and the helmet holds its setting consistently. MIG and stick work often use shades around 10–13, while TIG settings vary with amperage and electrode size. Use the welding machine and helmet manufacturers’ shade recommendations rather than choosing by comfort alone.
Passive fixed-shade lenses
Passive helmets are simple, durable, and do not require electronic power. They can work well for repetitive production welding at one known shade, but lifting the helmet for every repositioning is slower and increases the chance of looking toward an arc before the helmet is down. They are less versatile for beginners or jobs that alternate between welding and grinding.
Key specifications that affect comfort and protection
| Specification | Useful target | Why it matters |
|---|---|---|
| Viewing area | At least 3.5 × 1.75 in; 3.7 × 1.8 in or larger for fabrication | Improves joint visibility and reduces head movement |
| Welding shade | Variable shade 9–13 for general work; low-light setting around shade 3–4 | Supports multiple processes and safer setup |
| Lens reaction time | Approximately 1/25,000 second or faster | Reduces the time the lens remains light after arc ignition |
| Helmet weight | About 1.0–1.5 lb for comfortable extended use | Less neck load, especially when the shell sits far forward |
| Arc sensors | Four for varied positions; two may suit simple work | Improves detection when one sensor is blocked |
| Battery | Replaceable lithium or coin-cell batteries, or solar plus replaceable backup | Allows service instead of replacing the whole helmet |
How to set up a welding helmet correctly
- Set the shade before striking an arc. Start with the recommended shade for your process and current. If the arc appears uncomfortably bright, stop and increase protection rather than simply relying on the lens’s comfort setting.
- Adjust the headgear before tightening the rear knob. Set the crown height so the shell sits level, then adjust the distance from your face. The lens should be close enough for a useful view without touching your nose or safety glasses.
- Set sensitivity for the environment. Increase sensitivity for low-amperage TIG. Reduce it if nearby welding arcs, bright sunlight, or work lights cause unwanted darkening.
- Choose delay according to the job. A short delay is convenient for quick tack welds. A longer delay helps when a hot workpiece continues to glow after the arc stops.
- Test the helmet before welding. Check that the lens darkens when exposed to a suitable test light or arc, and inspect the outer cover lens for cracks, pitting, or heavy spatter.
Ownership costs and maintenance
The replaceable cover lens usually wears out before the auto-darkening cartridge. Spatter, grinding dust, and scratches can make a good helmet seem optically poor. Keep spare inner and outer cover lenses available, and replace them when visibility is reduced rather than polishing aggressively; abrasive cleaning can create permanent distortion.
For a simple cost-per-use comparison, a $240 helmet used for 240 welding sessions costs about $1 per session before replacement covers and batteries. A $75 helmet used 20 times costs $3.75 per session. The cheaper helmet wins only if its headgear, optics, and controls remain acceptable for the actual workload.
Use a soft, damp microfiber cloth for the lens and shell, keep the helmet away from direct high heat, and do not store it with the lens facing down on a dirty bench. Replace batteries according to the manufacturer’s instructions, even if solar charging is included. Never weld with a cracked shell, damaged lens, or malfunctioning auto-darkening cartridge.
Bottom line
Choose the Lincoln Electric VIKING 3350 for a large, clear general-purpose view; the Miller Digital Elite for extensive digital adjustability and broad coverage; and the 3M Speedglas 9100 when TIG sensitivity, refined headgear, and long-session comfort justify the higher cost. For occasional repairs, a well-specified four-sensor entry-level helmet is sufficient, provided it has the correct shade range, replaceable cover lenses, and independently adjustable headgear.
Ready to decide? Our #1 pick for 2026 is the Occasional repairs and hobby work.
Live price & availability on Amazon.




Write Your Review
No reviews yet. Be the first to share your experience!